Index Management
Index Management
For each different type of index a dedicated portlet is available to manage the available indexes, create new index nodes and manage the IndexType generic resources that are used when creating new indexes. Currently 2 portlets are available:
- FullTextIndexManagement portlet
- ForwardIndexManagement portlet
Both portlets have the same User Interface and offer the same functionality. Thus we will present here one of the 2 portlets
Full Text Index
After opening the the FullTextManagementPortlet, you see a screen with an Index Explorer tree on the left side, and an (empty) Index Detail panel on the right. The IndexDetail Panel is empty as no index resource has currently been selected in the Index Explorer tree. The Index Explorer panel, however, always displays one or more folder icons when the portlet is ready for use:
The folder icons represent the collections available in the VO. A big green folder represents a collection which has one or more related indices. A big blue folder represents a collection which does not have any related index. The single blue folder marked with a pencil and labeled as "Fake Collections" is the only icon which is always present even if no collections exists. This icon represents all collection IDs which are related to one or more indices, but which can not be mapped to a current available collection.
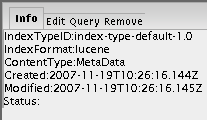
If you select an Index Node item in the Index Explorer, the Index Detail panel will show a tab panel with information related to the selected resource as you can see on the picture above. For each index node you can see:
- The cluster it belongs to
- When it was created
- When it was last modified
- The host of this index
Moreover you can:
- Feed the index by providing a ResultSet locator
- Query the index given a CQL query
- Remove the index. If the index contains more than one collections, only the data related to the specific collection is removed
Editing the IndexType
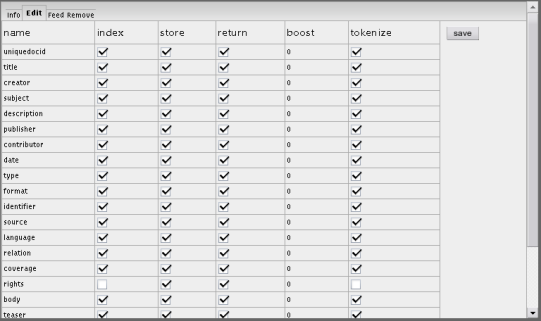
In order to edit the Index Type of an Index Node, make sure the correct Index item is selected in the Index Explorer, then select the "Edit" tab in the Index Detail tab panel. This will reveal Index Edit panel:
The chosen Index items IndexType is displayed as a list of Index Type Fields with editable checkboxes. The save button saves the IndexType currently shown into the selected Index Management resource.
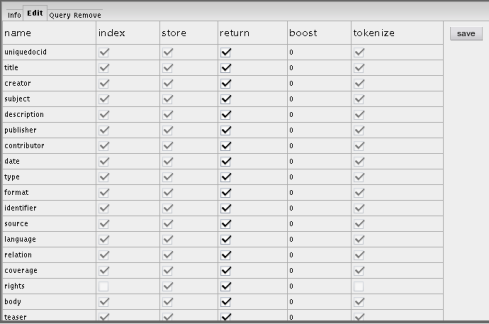
If a Index Node item has been selected, choosing the "Edit" tab will reveal the Index Node Edit panel:
This panel is identical to the Index Edit panel, however only the "Return" checkboxes are enabled. This is due to the fact that the Return Element is the only part of an IndexNode's index type which is editable. Any other change has to be performed towards the Index Node (using the Index Edit panel)
Creating a Full Text Index
Creating a new Index can be accomplished by either selecting the "New Index" item (marked [1] below) in the Index Explorer:
Upon selecting this item, the Index Detail panel allows you to specify the properties of the new Index. The ClusterID can be left empty if we want a new cluster to be created (it also requires the FullTextNode Service to have this option specified in the service configuration, more details here. If an existing ClusterID is given then the new node will join this cluster.
NOTE: A major difference from the old Full Text Index is that IndexType is not needed on the creation of the index. An index can hold collections with different IndexTypes as each IndexType is specified in the rowsets that the index is fed with.
After specifying the properties of the new Index, push the "Create" button in order to create the new Index. Upon success, the new Index Item appears as the active element in the Index Explorer. The "Info" tab of the new Index is then shown in the Index Detail panel:
As shown in the image above, the Index Detail panel is usually unable to retrieve information about the newly created Index. This is due to the fact that there is a slight lag between the creation of an Index and the availability of information about it. Clicking the newly created Index item once more will update the Index Detail panel with valid data.
Creating a Full Text Index Node
In order to query an Index, an Index Node resource is needed. An Index Node can be created at any point in the life time of an Index, and will automatically be updated when new information is indexed within the cluster. In order to create a new Index Node resource for an Index, select the "New Node" item under the Index item in the Index Explorer:
The Index Detail panel shows a very simple interface, allowing you to specify the Lemmatizer plugin the new Index Node should use. Usually, this text box should be left empty, in which case the default Lemmatizer plugin is used. Pushing the "Create" button triggers the creation of the new Index Node. Upon success, an item with a new icon appears as the active element in the Index Explorer. This item represents the newly created Index Node. The "Info" tab of the Index Node is then shown in the Index Detail panel:
As it occurs in the creation of an Index, the Index Detail is usually not able to get information about the Index Node right after its creation, in which case you have to select the Node item once more if you need to see valid information about the new item.
Feeding a Full Text Index
The information to be indexed is fed to the Index through a ResultSet. In order to index the ResultSet, select the Index item to be used in the Index Explorer, and choose the "Feed" tab. Enter a valid RSLocator string in the textbox as shown below (the RSLocator string in the example is a bit strange one since it points to a local ResultSet):
Push the "Update" button to start the indexing of the provided ResultSet. A green label will indicate that the update has been successfully started:
Testing/Querying a Full Text Index
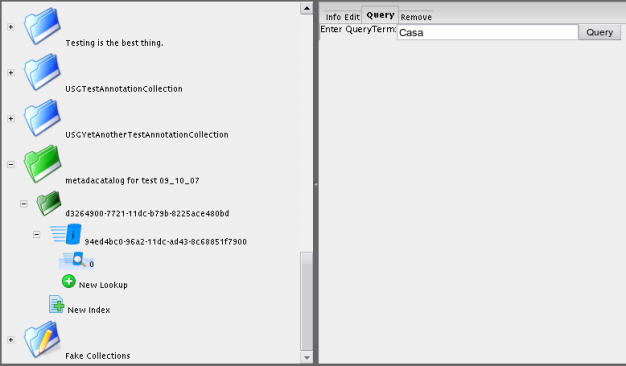
In order to test (by querying) an Index, an Index Node for the Index in question is needed. If no Index Node is available, it has to be created. If an Index Node is available for the Index to be queried, select the Index Node in the Index Explorer and select the "Query" tab in the Index Detail panel. This tab allows you to enter a query string as shown below:
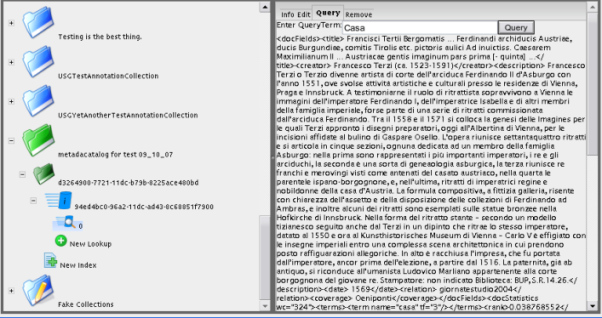
Pushing the Query button will perform a query against the Index Node. Upon success, the first page of the results of the query will be shown in its raw XML format bellow the query text box:
Removing a Full Text Index or Index Node
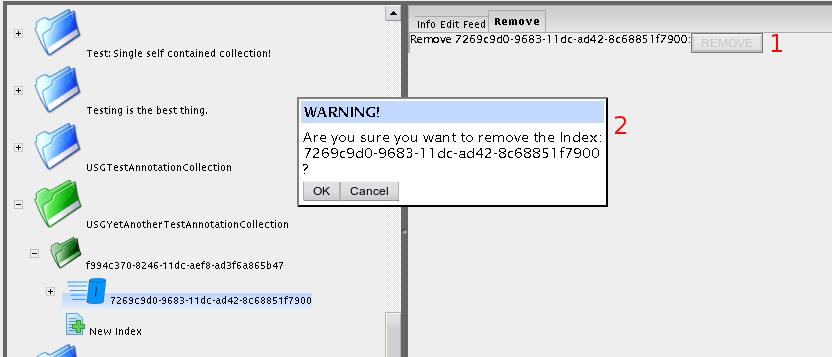
In order to remove an Index or an Index Node, select the item to be removed in the Index Explorer and choose the "Remove" tab in the Index Detail. Clicking the remove button (marked [1] below), will cause a warning dialog (marked [2]) to be shown. Push the "OK" button to remove the resource (and keep in mind that removing an Index resource will automatically remove all Index Node resources connected to it):
Upon success, a green confirmation message will be shown:
Upon failure, a red error message is shown. This message is usually due to the fact that the resource just removed is still being present in the Index Explorer due to delays in the underlying infrastructure.
Full Text Index
After opening the the FullTextManagementPortlet, you see a screen with an Index Explorer tree on the left side, and an (empty) Index Detail panel on the right. The IndexDetail Panel is empty as no index resource has currently been selected in the Index Explorer tree. The Index Explorer panel, however, always displays one or more folder icons when the portlet is ready for use:
The folder icons represent metadata collections available in the VO. A big green folder (marked with a [1] above) represents a collection name which has one or more related indices. A big blue folder (marked [2]) represents a collection name which does not have any related index. The single blue folder marked with a pencil and labeled as "Fake Collections" (marked [3]) is the only icon which is always present even if no collections exists. This icon represents all collection IDs which are related to one or more indices, but which can not be mapped to a true metadata collections. This is a usual scenario for test indices, in order to avoid other resources harvesting the epr of the test index from DIS when looking for valid indices of a specific collection.
A collection name is not necessarily unique, as many collections are allowed to have the same name though not the same ID. Actual metadata collections are represented by a smaller folder icon, along with its collection ID. Collections which have been indexed, are represented by a green folder (marked [4]), while collections which have not been indexed are represented by a grey folder (marked [5]).
Full Text Index Information
If you expand the green collection tree items (by clicking on the [+] beside them), one or more Index icons (marked [1] below) appear. These represent Index Managers. If some Index Lookups are connected to the Index Manager, the Index item can be expanded to reveal one or more Index Lookup icons (marked[2]):
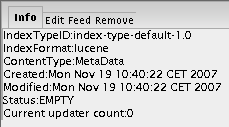
If you select either an Index item or an Index Lookup item in the Index Explorer, the Index Detail panel will show a tab panel with information related to the selected resource (WS ResourceProperty values). If an Index item is chosen, the IndexDetail will look similar to the following illustration:
And if an Index Lookup item is chosen, it will look like the following:
Editing the IndexType
In order to edit the Index Type of an Index Manager, make sure the correct Index item is selected in the Index Explorer, then select the "Edit" tab in the Index Detail tab panel. This will reveal Index Edit panel:
The chosen Index items IndexType is displayed as a list of Index Type Fields with editable checkboxes. The save button saves the IndexType currently shown into the selected Index Management resource.
If a Index Lookup item has been selected, choosing the "Edit" tab will reveal the Index Lookup Edit panel:
This panel is identical to the Index Edit panel, however only the "Return" checkboxes are enabled. This is due to the fact that the Return Element is the only part of an IndexLookup's index type which is editable. Any other change has to be performed towards the Index Management (using the Index Edit panel)
Creating a Full Text Index
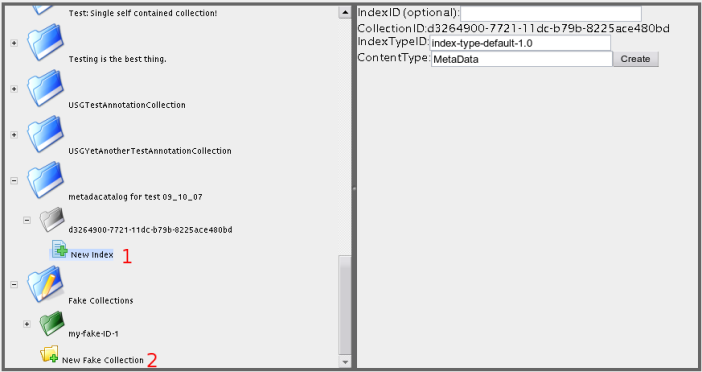
Creating a new Index can be accomplished by either selecting the "New Index" item (marked [1] below) or the "New Fake Collection" item (marked [2])in the Index Explorer:
Upon selecting one of the two items mentioned above, the Index Detail panel allows you to specify the properties of the new Index. The IndexID property textbox should usually be left empty, in which case the IndexService itself creates a unique ID for the Index. If the "New Fake Collection" item has been chosen, you also need to specify a collection ID (fake - e.g., "myTestCollection1" or something like this), however if the "New Index" item has been chosen, the collection ID will be retrieved from the parent collection item and will not be editable (as shown in the image above).
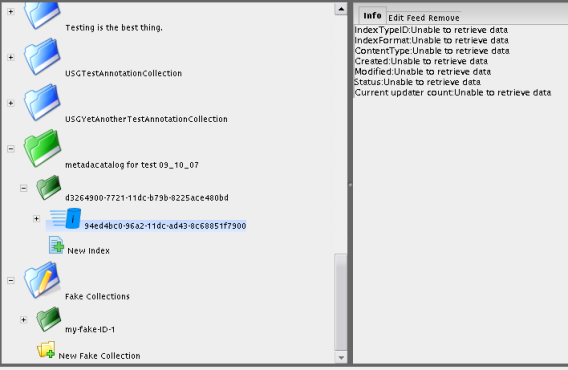
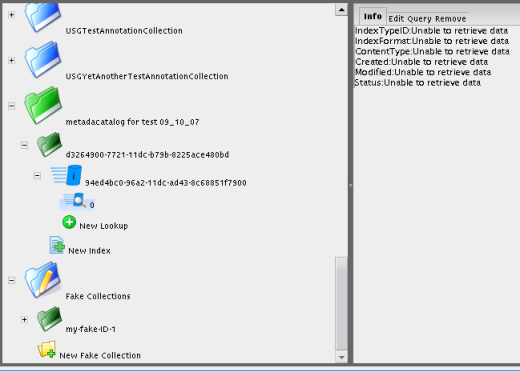
After specifying the properties of the new Index, push the "Create" button in order to create the new Index. Upon success, the new Index Item appears as the active element in the Index Explorer. The "Info" tab of the new Index is then shown in the Index Detail panel:
As shown in the image above, the Index Detail panel is usually unable to retrieve information about the newly created Index. This is due to the fact that there is a slight lag between the creation of an Index and the availability of information about it. Clicking the newly created Index item once more will update the Index Detail panel with valid data.
Creating a Full Text Index Lookup
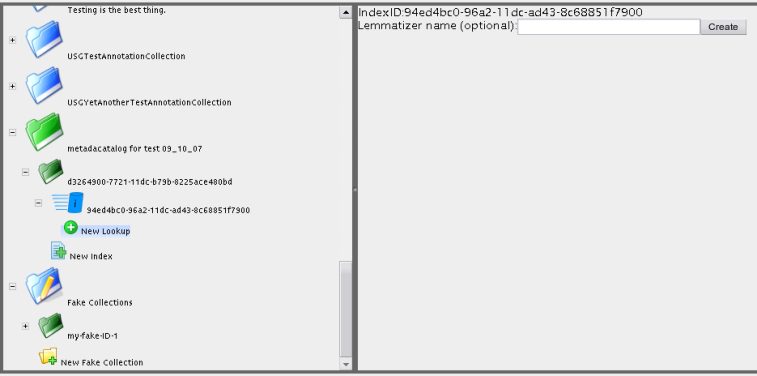
In order to query an Index, an Index Lookup resource is needed. An Index Lookup can be created at any point in the life time of an Index, and will automatically be updated when new information is indexed by its Index Manager. In order to create a new Index Lookup resource for an Index, select the "New Lookup" item under the Index item in the Index Explorer:
The Index Detail panel shows a very simple interface, allowing you to specify the Lemmatizer plugin the new Index Lookup should use. Usually, this text box should be left empty, in which case the default Lemmatizer plugin is used. Pushing the "Create" button triggers the creation of the new Index Lookup. Upon success, an item with a new icon appears as the active element in the Index Explorer. This item represents the newly created Index Lookup. The "Info" tab of the Index Lookup is then shown in the Index Detail panel:
As it occurs in the creation of an Index, the Index Detail is usually not able to get information about the Index Lookup right after its creation, in which case you have to select the Lookup item once more if you need to see valid information about the new item.
Feeding a Full Text Index
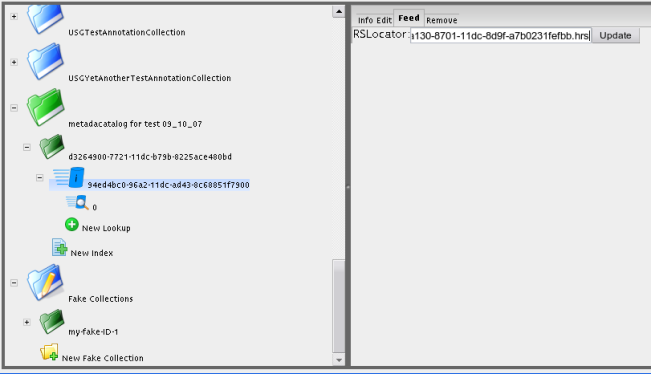
The information to be indexed is fed to the Index through a ResultSet. In order to index the ResultSet, select the Index item to be used in the Index Explorer, and choose the "Feed" tab. Enter a valid RSLocator string in the textbox as shown below (the RSLocator string in the example is a bit strange one since it points to a local ResultSet):
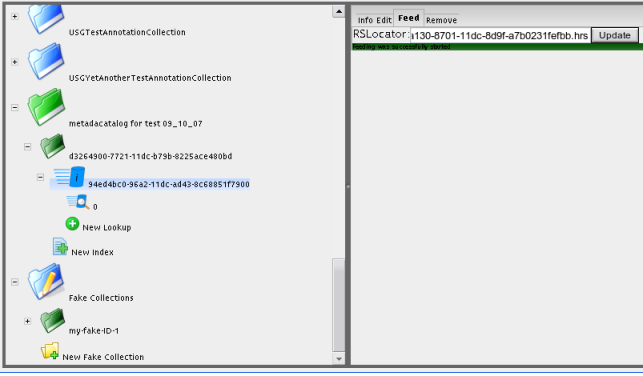
Push the "Update" button to start the indexing of the provided ResultSet. A green label will indicate that the update has been successfully started:
Testing/Querying a Full Text Index
In order to test (by querying) an Index, an Index Lookup for the Index in question is needed. If no Index Lookup is available, it has to be created. If an Index Lookup is available for the Index to be queried, select the Index Lookup in the Index Explorer and select the "Query" tab in the Index Detail panel. This tab allows you to enter a query string as shown below:
Pushing the Query button will perform a query against the Index Lookup. Upon success, the first page of the results of the query will be shown in its raw XML format bellow the query text box:
Removing a Full Text Index or Index Lookup
In order to remove an Index or an Index Lookup, select the item to be removed in the Index Explorer and choose the "Remove" tab in the Index Detail. Clicking the remove button (marked [1] below), will cause a warning dialog (marked [2]) to be shown. Push the "OK" button to remove the resource (and keep in mind that removing an Index resource will automatically remove all Index Lookup and Index Updater resources connected to it):
Upon success, a green confirmation message will be shown:
Upon failure, a red error message is shown. This message is usually due to the fact that the resource just removed is still being present in the Index Explorer due to delays in the underlying infrastructure.

