Tabular Data Widget
The Tabular Data Widget (TDW) is a GWT component for tabular data visualization and manipulation.
The TDW components extends the GXT Live grid component enhancing it with:
- dynamic data model
- custom data source definition
- common tabular data operations
- graph visualization
Contents
Tabular Data Widget Architecture
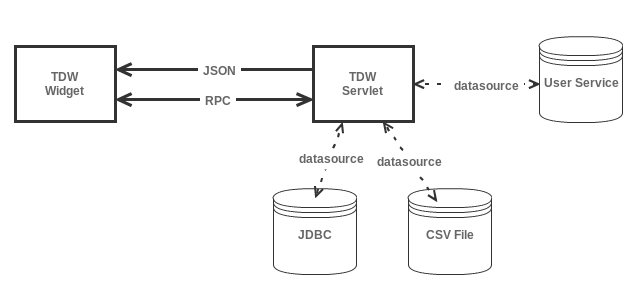
The TDW is composed by several GWT components, in the figure grouped as TDW widget, and two HTTP servlet, one for the GWT RPC mechanism and another as JSON provider, both represented as TDW servlet. The TDW servlet communicates with the available datasources in order to retrieve the necessary information for the tabular data visualization. Both modules, TDW widget and servlet, are integrated by the hosting application in order to use the TDW.
Tabular Data Model
The TDW visualizes tables. A table is defined though a table definition. The table definition describes some essential information about the table (id, name, etc) and it keeps a description of each column belonging to the table. The column definition keeps some information about the described column like id, label, the type of data in the column and so on. The table content is returned by the datasource as JSON object represented as Java String.
The table definition is retrieved by the TDW servlet through a DataSource. A DataSource is the gateway to the single table meta information and data. The datasource are maintained by the DataSourceFactory and are retrieved by id.
JSON Data
The table data is produced as JSON Object. The object has those properties:
- Data: the table data as JSON Array where each value is a table row. A table row is a JSON object with a property for each cell value. The cell property has a key the column id and as value the cell value.
- TotalLength: the total table size, as number value.
- Offset: the staring row index of the JSON data.
Here an example of JSON object:
{"data":[
          {"eezall":"288","faoaream":34,"faoareayn":false,"speciesid":"Fis-10199","csquarecode":"1000:350:3","lme":28,"boundboxyn":false,"probability":1.0,"idColumn":"0"},
          {"eezall":"288","faoaream":34,"faoareayn":false,"speciesid":"Fis-10199","csquarecode":"1000:350:4","lme":28,"boundboxyn":false,"probability":1.0,"idColumn":"1"},
          {"eezall":"288, 768","faoaream":34,"faoareayn":false,"speciesid":"Fis-10199","csquarecode":"1000:351:3","lme":28,"boundboxyn":false,"probability":1.0,"idColumn":"2"},
          {"eezall":"768, 288","faoaream":34,"faoareayn":false,"speciesid":"Fis-10199","csquarecode":"1000:361:1","lme":0,"boundboxyn":false,"probability":1.0,"idColumn":"3"},
          {"eezall":"204, 768","faoaream":34,"faoareayn":false,"speciesid":"Fis-10199","csquarecode":"1000:361:2","lme":0,"boundboxyn":false,"probability":1.0,"idColumn":"4"},
          {"eezall":"356","faoaream":51,"faoareayn":true,"speciesid":"Fis-10199","csquarecode":"1007:495:4","lme":32,"boundboxyn":false,"probability":0.39,"idColumn":"199"}
         ],
"totalLength":1162602,
"offset":0}
Custom DataSource and DataSourceFactory
Installation
In order to use the widget you need to perform those steps:
- add the widget library as project dependency
- add this entry to your <project>.gwt.xml file:
<inherits name="org.gcube.portlets.user.tdw.TabularDataWidget" /> - add those entries to your web.xml files:
	<!-- TDWidget -->

	<servlet>
		<servlet-name>tdwService</servlet-name>
		<servlet-class>org.gcube.portlets.user.tdw.server.TabularDataServiceImpl</servlet-class>
	</servlet>

	<servlet-mapping>
		<servlet-name>tdwService</servlet-name>
		<url-pattern>/[APPLICATION NAME]/tdw</url-pattern>
	</servlet-mapping>

	<servlet>
		<servlet-name>tdwServlet</servlet-name>
		<servlet-class>org.gcube.portlets.user.tdw.server.TabularDataServlet</servlet-class>
	</servlet>

	<servlet-mapping>
		<servlet-name>tdwServlet</servlet-name>
		<url-pattern>/[APPLICATION NAME]/tdwdata</url-pattern>
	</servlet-mapping>
where [APPLICATION NAME] is your gwt application name.
Example
First use
On the UI side:
	TabularData tabularData = new TabularData("SimpleJDBCDataSourceFactory");
	TabularDataGridPanel grid = tabularData.getGridPanel();
Where "SimpleJDBCDataSourceFactory" is the default datasourcefactory to use when opening a new table. You can add the grid widget to any panel in your application.
On the Server side you can register a datasourcefactory as showed here:
	SimpleJDBCDataSourceFactory dataSourceFactory = new SimpleJDBCDataSourceFactory();
	dataSourceFactory.registerTable("jdbc:derby:/tmp/testtd", "MYTEST");
	dataSourceFactory.registerTable("jdbc:derby:/tmp/testtd", "TESTTYPES");
	dataSourceFactory.registerTable("jdbc:postgresql://dbtest.next.research-infrastructures.eu/testdb?user=gcube&password=XXXXXXXXX", "hspen_mini");
	dataSourceFactory.registerTable("jdbc:postgresql://dbtest.next.research-infrastructures.eu/testdb?user=gcube&password=XXXXXXXXXXX", "hspec_suitable_test_2");
	dataSourceFactory.registerTable("jdbc:ts:federico.defaveri:/d4science.research-infrastructures.eu/FARM/ICIS", "39267730-03bd-11e1-966a-986db86e0fcf");

        DataSourceFactoryRegistry.getInstance().add(dataSourceFactory);
Define a custom style for rows
You can define a custom style for the table rows based on row field values. The styles are specified using CSS.
In this example I will show you how to highlight some selected rows.
First we define our style, update your css application file adding this definition:
.highlight td {
    font-weight: bold !important;
    color: #FF0000 !important;
}
Using this style we will make the text in the selected row bold and red.
Then we have to define our custom row style provider:
public class RowStyleProviderSample implements RowStyleProvider {

	/**
	 * {@inheritDoc}
	 */
	@Override
	public String getRowStyle(Row row) {
		String value = row.getField("myId");
		return value.endsWith("0")?"highlight":"";
	}

}
The getRowStyle method will be called for each row show in the widget. The passed Row object represents the row fields.
In our example we get the "myId" field value. If the value ends with '0' we return the "highlight" style, otherwise no style is returned.
