Difference between revisions of "Tabular Data Manager"
(→File Menu) |
(→File Menu) |
||
| Line 47: | Line 47: | ||
<!--Chiara consiglia:--> | <!--Chiara consiglia:--> | ||
:To open your tabular resource you need to click on the Home tab and on the Open button of the File menu. | :To open your tabular resource you need to click on the Home tab and on the Open button of the File menu. | ||
| − | A window will appear to show the list of tabular resources already uploaded in your workspace and thus available to be visualized | + | :A window will appear to show the list of tabular resources already uploaded in your workspace and thus available to be visualized |
[[Image:tabular_data_manager_openbutton.png|frame|center|Tabular Data Manager, Open button in the Home tab]] | [[Image:tabular_data_manager_openbutton.png|frame|center|Tabular Data Manager, Open button in the Home tab]] | ||
;Close | ;Close | ||
<!--Chiara suggerisce:--> | <!--Chiara suggerisce:--> | ||
| − | A singular tabular resources can be closed directly in the bottom menu of the central panel (See Figure in Section "Main area"). You can also use the close button on the top of the ribbon menu, Home-> File, which allows to close all the open tables in you working environment. | + | :A singular tabular resources can be closed directly in the bottom menu of the central panel (See Figure in Section "Main area"). You can also use the close button on the top of the ribbon menu, Home-> File, which allows to close all the open tables in you working environment. |
[[Image:tabular_data_manager_closeall.png|frame|center|Tabular Data Manager, close button in the Home tab]] | [[Image:tabular_data_manager_closeall.png|frame|center|Tabular Data Manager, close button in the Home tab]] | ||
;Delete | ;Delete | ||
| − | It is possible to delete your table resources using the button Delete on the File menu of the Home tab. The resource will not be available into your workspace anymore. A po-up window will appear to confirm the operation. | + | :It is possible to delete your table resources using the button Delete on the File menu of the Home tab. The resource will not be available into your workspace anymore. A po-up window will appear to confirm the operation. |
[[Image:tabular_data_manager_delete.png|frame|center|Tabular Data Manager, deletebutton]] | [[Image:tabular_data_manager_delete.png|frame|center|Tabular Data Manager, deletebutton]] | ||
;Properties | ;Properties | ||
<!--Chiara suggests--> | <!--Chiara suggests--> | ||
| − | The tab properties shows the main characteristics of the activated table, for example: description, type and owner. See image in section Tools Area. | + | :The tab properties shows the main characteristics of the activated table, for example: description, type and owner. See image in section Tools Area. |
;Clone | ;Clone | ||
| − | You can create one or more copies of your table using the Clone button in the File menu. | + | :You can create one or more copies of your table using the Clone button in the File menu. |
;Grid Menu | ;Grid Menu | ||
<!--Chiara suggerisce:--> | <!--Chiara suggerisce:--> | ||
| − | A column and a context menu, are available directly on your tabular resource. By using the column menu, which appear in each column header, you can access to the main functionalities, present in the tabs of the ribbon bar (see image in the section Column Menu). On the other hand, the right click on the cell allows to execute basic operations (see image of the section Contex Menu) | + | :A column and a context menu, are available directly on your tabular resource. By using the column menu, which appear in each column header, you can access to the main functionalities, present in the tabs of the ribbon bar (see image in the section Column Menu). On the other hand, the right click on the cell allows to execute basic operations (see image of the section Contex Menu) |
:Example of the Grid Header Column Menu | :Example of the Grid Header Column Menu | ||
Revision as of 13:03, 3 February 2015
This is the user guide to Tabular Data Manager portlet.
Overview
Tabular data manager, is a working environment which ensures the management of tabular resources such as datasets, codelist and generic tables. Different types of data can be imported into the platform and a set of operations performed to create, explore and partially manipulate your file. Tabular Resources are used in different scientific fields ranging from statistics to signal processing and econometrics. Among the available facilities of Tabular Data Manager is the possibility to check for data correctness using codelist files, to perform aggregating and filtering operations. The main strength of the platform is the management of big dataset with more than million of data without having problems in exploring and further process your file.

Main interface features
Composition of the interface :
- Ribbon menu
- The interface consists of a top ribbon menu of four tabs (i.e Home, Curation, Modify and Analyse) which includes the main functionalities of the portlet.


- Tools area
- The interface has a left side panel, which reports the main characteristics of the activated table (i.e tab properties). In also, you can visualize the list of the performed operations (once you have already manipulated your file) and if those have been successfully validated (i.e validation tab).

- Main area
- In the central panel, your active tabular resource is displayed. The picture shows on which table you are working on as confirmed by the bottom panel.

Home
File Menu
- This section includes basic operations to open, close, delete, investigating the properties and clone your table.
- Open
- A window will show the list of tabular resource available to the user.
- To open your tabular resource you need to click on the Home tab and on the Open button of the File menu.
- A window will appear to show the list of tabular resources already uploaded in your workspace and thus available to be visualized

- Close
- A singular tabular resources can be closed directly in the bottom menu of the central panel (See Figure in Section "Main area"). You can also use the close button on the top of the ribbon menu, Home-> File, which allows to close all the open tables in you working environment.

- Delete
- It is possible to delete your table resources using the button Delete on the File menu of the Home tab. The resource will not be available into your workspace anymore. A po-up window will appear to confirm the operation.

- Properties
- The tab properties shows the main characteristics of the activated table, for example: description, type and owner. See image in section Tools Area.
- Clone
- You can create one or more copies of your table using the Clone button in the File menu.
- Grid Menu
- A column and a context menu, are available directly on your tabular resource. By using the column menu, which appear in each column header, you can access to the main functionalities, present in the tabs of the ribbon bar (see image in the section Column Menu). On the other hand, the right click on the cell allows to execute basic operations (see image of the section Contex Menu)
- Example of the Grid Header Column Menu

- Example of the Context Menu

Import Menu
- CSV
Users can import their file in .csv format, by clicking on the CSV button in the Home tab.

The user can specify using a pop-up window the file source. There are two possibilities: File source, if you want to retrieve your files from your local computer or Workspace, if you want to retrieve them from your workspace.

After, several pop-up windows will appear for both file configuration and detail.


A final pop-up window will inform you when the file is successfully imported

- SDMX
Export Menu
- CSV
Users can export their file in a .csv format, by clicking on the CSV button in the Export menu of the Home tab.

Using a pop-up window, the user specifies the folder into the workspace where the file will be saved. From the workspace the file can be downloaded in local.

A pop-up windows will help you to configure your file for the export.

A final pop-up window will inform you the success of the export procedure.

- JSON
- SDMX
Template Menu
- New
- Open
- Delete
Tasks Menu
- Timeline
- Background
History Menu
- History
- Undo
Help
Curation
Validation Menu
- Duplicate Detection
- Apply Template
Structure Menu
- Split Column
- Here below, an example of the application of the CHAR SEQUENCE method in the Column Split function:
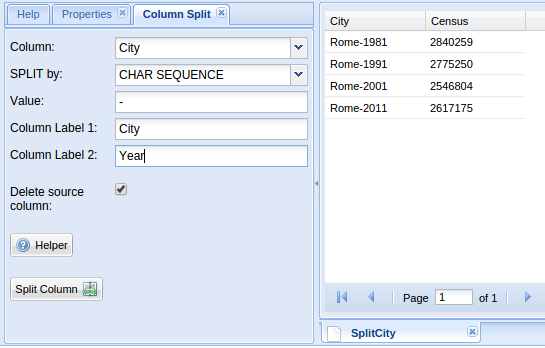 Tabular Data Manager, split column and char sequence method

- The original table is transformed into:
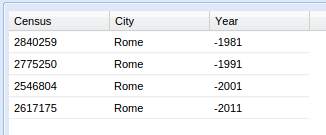 Tabular Data Manager, split column by char sequence

- Here below an example of the application of the INDEX method in the Column Split function:
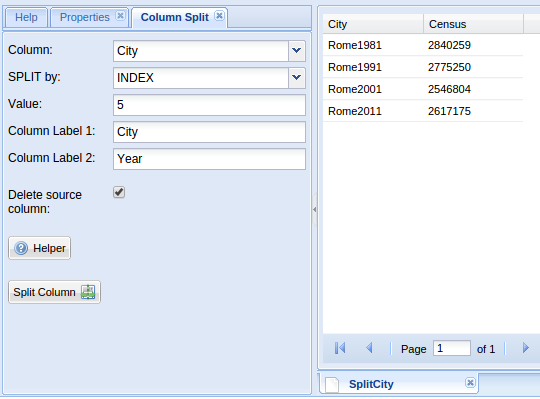 Tabular Data Manager, split column and index method

- The original table is transformed into:
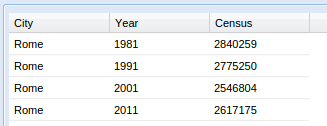 Tabular Data Manager, split column by index

- Here below an example of the application of the REGEX method in the Column Split function:
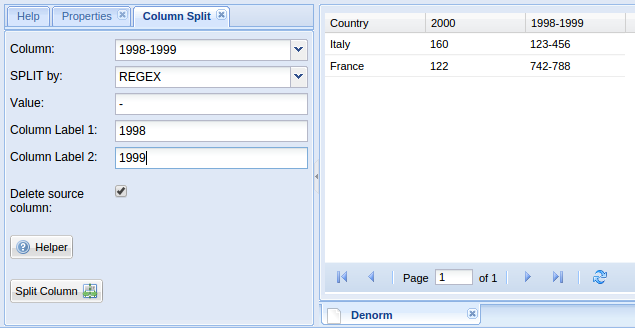 Tabular Data Manager, split column and regex method

- The original table is transformed into:
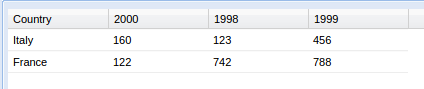 Tabular Data Manager, split column by regex

- N.B. Value is a POSIX Regular Expression
- Normalize
If you want to normalize your Tabular resource, you can continue as follow:

Considering the structure of our table you will name a Normalized and a Value column. The system will create these two new columns at the end of the normalization. In the pop-up setting windows, the Normalized Column will be the column containing the normalized variables, whereas the Value column will contain the values of the normalized data (i.e Normalized column: 'Year', Value column:'Quantity' and columns to normalize '1998', '1999' and '2000' )
The original table is transformed into:

- Denormalize
A table resource can be denormalized using the Denormalize button in the Structure menu of the Curation tab: The original table, can be transformed by selecting the Value column and the Attribute column. Using the normalized table of the previous section, by setting 'Quantity' as value column and 'Year' as attribute column we will obtain the original table:

Helper Menu
- Extract Codelist
There is the possibility to extract a codelist from Tabular resources. Let's use the table below:

Click on the Extract codelist button, in the Helper menu of the Curation tab:

Select the columns, for example 'code' and 'name':

Define the target column, for example new column:

Define the label and the type of your new column:

The target column should appear as follow:

Choose a name for the new codelist:

A new codelist is extracted now:

If you want to directly connect the tabular resource to the codelist extracted, you must set attach on detail so:

The original tabular resource is attached to new codelist:

Attention, in this case the extracted codelist is set to final automatically.
- Map Import
Modify
The modify tab includes several functions in the Table menu to work on your Tabular Resources (i.e group, add, delete, unify table etc...)
 Tabular Data Manager, Modify tab

Table Menu
- Union
- In the Table menu, the Union button allows to relate one or more columns of your tables resources in one file.
- Here below, an example of the functionality of the Union button with one tabular resources.
- Selection of the files:
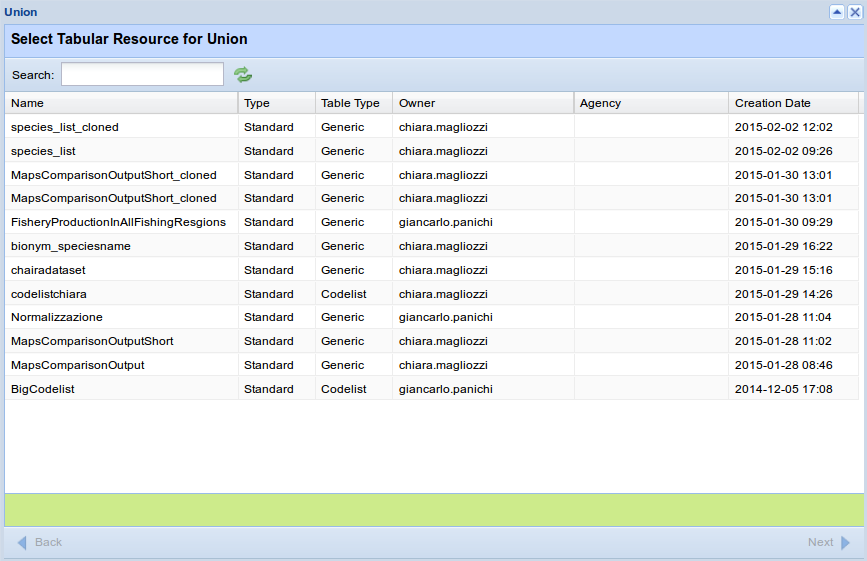 Tabular Data Manager, Selection of the files
- Selection of the column within the table resources to unify:
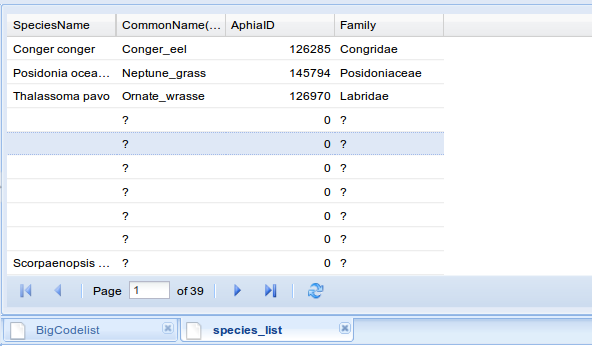
 Tabular Data Manager, Columns selection
- The original table has been transformed into:
 Tabular Data Manager, Table resulting from the Union function


A final pop-up window will inform you about the success of the union procedure.
Note: The system will report a question mark for the fields that are not involved in the union.The same if,in the selected column, there are empty fields.
- Group by
- Time aggregation
- Replace by External
- Add row
- Delete row
- Delete duplicate
Analyse
Chart Menu
- Create Chart
Process Menu
- R studio
- Statistical
- Spread
GIS Menu
- Create Map