Difference between revisions of "Adding a Quick tour guide to your portlet"
(→Customize Quick tour guide for your portlet) |
(→Customize Quick tour guide for your portlet) |
||
| Line 37: | Line 37: | ||
700, /* width */ | 700, /* width */ | ||
350, /* height */ | 350, /* height */ | ||
| − | false, /* mask */ | + | false, /* mask (When enabled, the background will be blocked with a semi-transparent panel) */ |
ThemeColor.MAGENTA /* themeColor */ | ThemeColor.MAGENTA /* themeColor */ | ||
); | ); | ||
Revision as of 19:58, 31 January 2012
Contents
gCube Quick tour guide
gCube Quick tour guide is a customizable dialogBox that can be loaded when your portlet starts up for new users. It is shipped with a built-in clickable option that allows a user to specify to not open it again.
gCube Quick tour guide comes with 12 different themes and is highly customizable. See some available themes in the picture below.
Adding a gCube Quick tour guide to your gCube Portlet Project
- Download the latest jar from here: gcube-quicktour.jar and add it to your build path.
- Add the following to your project .gwt.xml file
<!-- inherits GCUBE Quick tour -->
<inherits name='org.gcube.portlets.user.guidedtour.GuidedTour' />
You are ready to use it.
Show Quick tour guide at your portlet startup
In order to load the quick tour at portlet startup create a private (void) method in your GWT EntryPoint class, say you name it showGuidedTour() then you would put showGuidedTour() and the end of your public void onModuleLoad() method.
Customize Quick tour guide for your portlet
Within the showGuidedTour() method you must instanciate the GCUBEGuidedTour class (org.gcube.portlets.user.guidedtour.client.GCUBEGuidedTour)
There are several constructors you can use, allowing you to set its size, its theme, whether you want animation transitions or not and much more. Please refer to documentation to find the one that fits your needs.
Foeìr an example, see the code below:
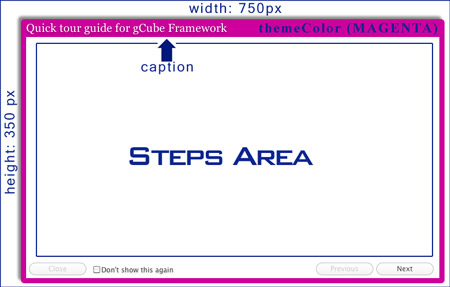
GCUBEGuidedTour gt = new GCUBEGuidedTour(
"gCube Framework", /* caption */
 MyClass.class.getName(),  /* uniqueid (needed for implementing the don'tShowThisAgain feature) */
 700, /* width */
 350, /* height */
 false,  /* mask (When enabled, the background will be blocked with a semi-transparent panel) */
 ThemeColor.MAGENTA /* themeColor */
);
will eventually create the following:
Adding steps to the tour
GCUBEGuidedTour supports templates(GCUBETemplate) for its steps. Although any Composite (com.google.gwt.user.client.ui.Composite) will do, we reccomend to use predefined Templates as shown in the following.
Creating Step from template
There are 3 Templates you can choose from, in each of these three the window is divided in two areas vertically.
- GCUBETemplate1Text1Image:
html | image
- GCUBETemplate1Text2Image:
         image
 html |
         image
- GCUBETemplate2Text2Image:
html | image

html | image
According to the GCUBETemplate you choose for your step you will have to implement some methods, the following example shows how to instanciate a step with aGCUBETemplate1Text1Image as template:
GCUBETemplate1Text1Image step1 = new GCUBETemplate1Text1Image(true) {

			@Override
			public String setStepTitle() {
				return "What's gCube";
			}

			@Override
			public String setStepImage() {
                                //get the image from the web, use relative path to get it from your project
				return "//www.gcube-system.org/templates/gcube/images/logo-top.gif";
			}

			@Override
			public String setStepBody() {
				return "gCube is a framework dedicated to scientists. It enables the declarative and interactive creation of transient Virtual Research Environments"
			}
		};
The body of your showGuidedTour() method will have something like the following:
private void showGuidedTour() {
    //this line create
    GCUBEGuidedTour gt = new GCUBEGuidedTour("Workspace", Workspace.class.getName(), 750, 450, false);

